Add and edit reason codes, categories, teams and folders
This is a feature in RS Production OEE
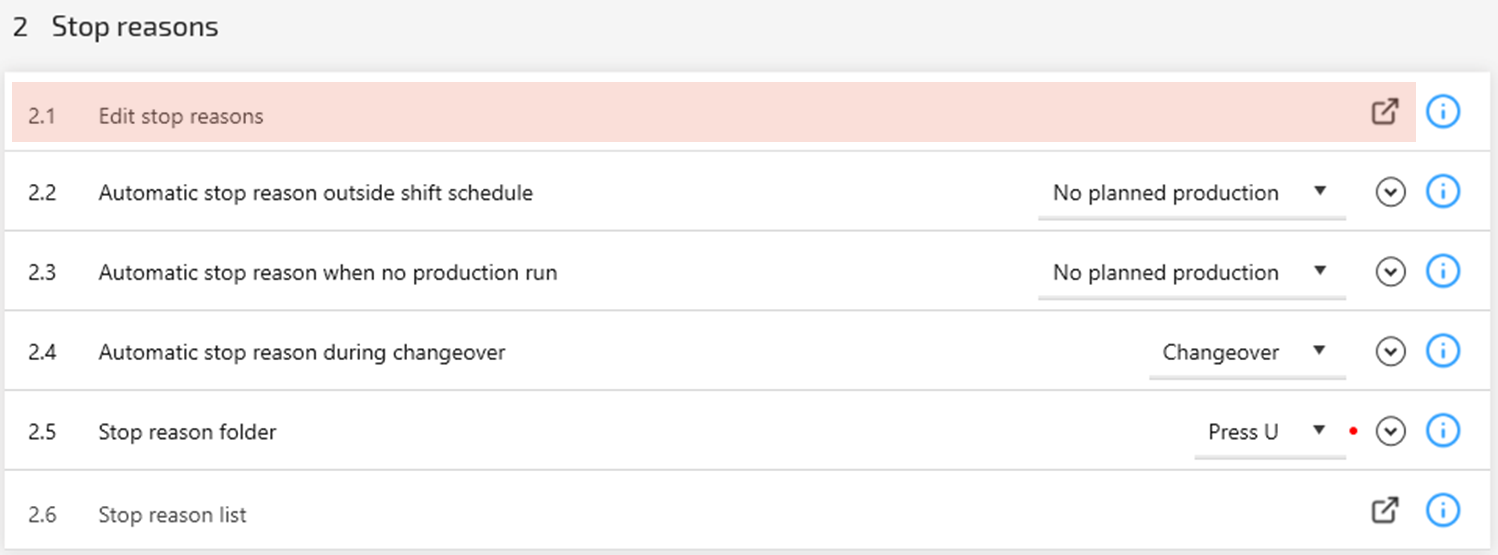
Follow the link to the right on the Edit stop reasons row to open the Reason Manager.
[In older versions, Click on “Production” in the main menu and then “Reason manager” in the submenu]
Reason Manager
RS Production’s Reason Manager handles
Reason codes
Categories (read more about Reason codes, categories and station codes)
Teams (read more about Reason codes, categories and station codes)
Folders (read more about Reason code folders)
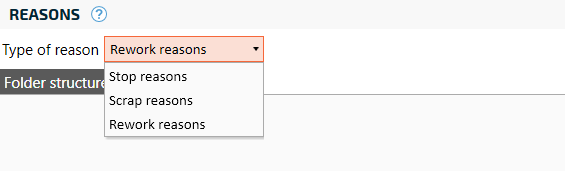
![]() Reason Manager handles all types of reason codes (downtime, speed loss, scrap, rework).
Reason Manager handles all types of reason codes (downtime, speed loss, scrap, rework).
Managing and adding reason codes
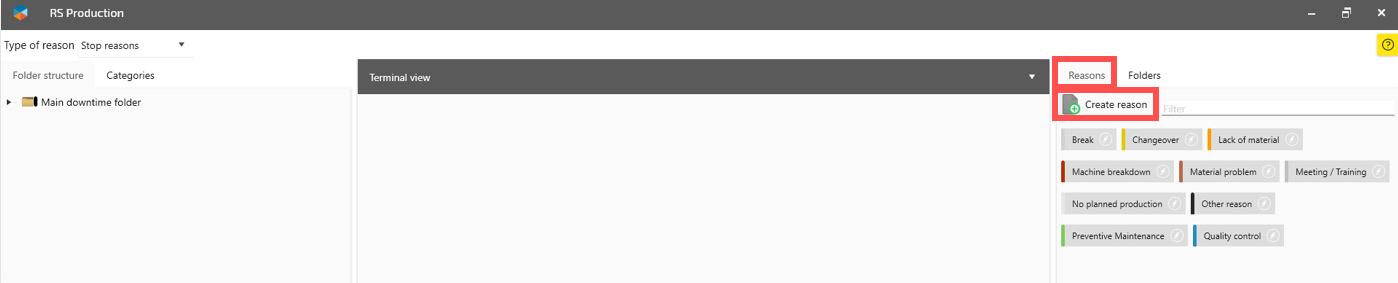
In the Reason Manager, select what type of reason code to manage. In the top left corner, select from stop/scrap/rework. Note that stop reasons handles both downtime and speed loss.
Manage existing reason codes
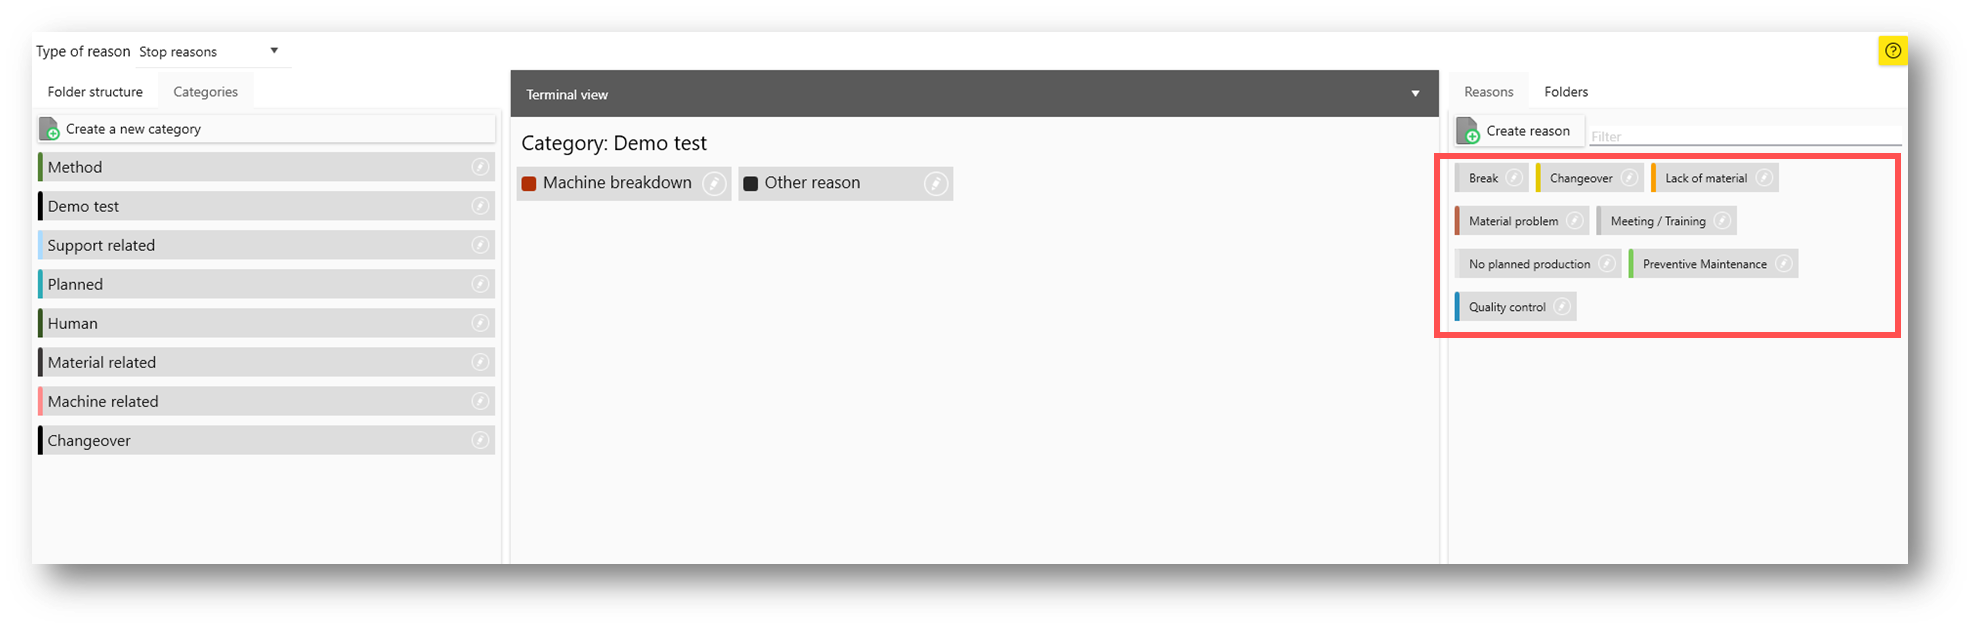
To manage reasons click Reasons on the right side of the Reason Manager. From here, you can overview the existing reasons. They are now shown in the field to the right in the Reason Manager.

Use pen-icon to open reason editor
To open the reason editor, click the Pen-icon on the right side of the reason button.
See the section “Add new reason codes” below for details on what the different fields means.
Make the adjustments you need and click Save to use the changed settings on the reason.
Delete a reason code
To remove the reason click Delete and answer the control question to make sure you are aware what it means to remove it from the system. Note that it will not be possible to “undo” the delete later.
Add new reason codes
To add new reason codes click Reasons on the right side of the Reason Manager. then click Create reason.
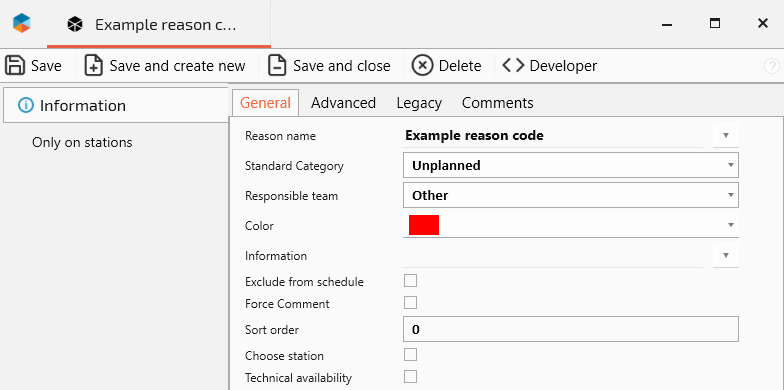
An empty reason code card is now shown to you. It have several parameters. You can set them when you create the reason code, or you can come back and change them at any time.
Remember that changes on reason codes will effect not only future collected data, but also historical collected data.
The reason code settings are divided into three different tabs.
General includes the most common settings. This is where you should start looking
Advanced have additional things for you who want to do more specific things
Legacy settings are on their way out of the system and it is not guaranteed that they are fully supported any more
Click Save and close when you’re done (or Save and create new to open make one more).
When ready adding (one or more) reason codes. They appear in the reason code field to the right in Reason Manager
![]() Note that you have yet not added the reason code to a folder. It is yet not connected to a measure point and that’s why it is yet not visible for machine operators.
Note that you have yet not added the reason code to a folder. It is yet not connected to a measure point and that’s why it is yet not visible for machine operators.
General reason code settings

Reason name | The name shown for operators and in reports. Note that there’s language support for this one. Different users can see the same information in their selected language. | |
Standard Category | Select one of RS Production OEE’s standard high level loss categories. This helps you aggregate and get a good overview. Read more about Standard categories and responsible teams for loss reasons | |
Responsible team | Select one of the standard responsible teams. This helps you aggregate and get a good overview. Read more about Standard categories and responsible teams for loss reasons | |
Color | The color that will visualize the loss in for both operators and report users. Read more about the Office tools color selector | |
Information | Add a simple instruction to the operator | |
Exclude from schedule | Only for stop (downtime + speed loss) | By opting for a reason code to be “excluded from schedule”, the loss time will be outside the OEE calculation and the stop will also not appear in the stop reports. Read more about Shift schedule |
Force comment | Mark this when it is mandatory for the operator to add a text comment to the pre defined reason code. Typical example is the reason code “reason unknown”. | |
Sort order | Decides in what order the reason codes are shown in Operator tools. Lowest number first. From left to right and from top to bottom. | |
Choose station | Only for stop (downtime + speed loss) | When choose stations is checked, operator must select both a reason and a station. Use this for reason codes where you’re interested in understanding what equipment that caused the loss. Read more about Reason codes, categories and station codes |
Technical availability | Only for stop (downtime + speed loss) | Mark this to include the loss in the calculation of maintenance KPI like technical availability, MTBF and MDT. |
Advanced reason code settings
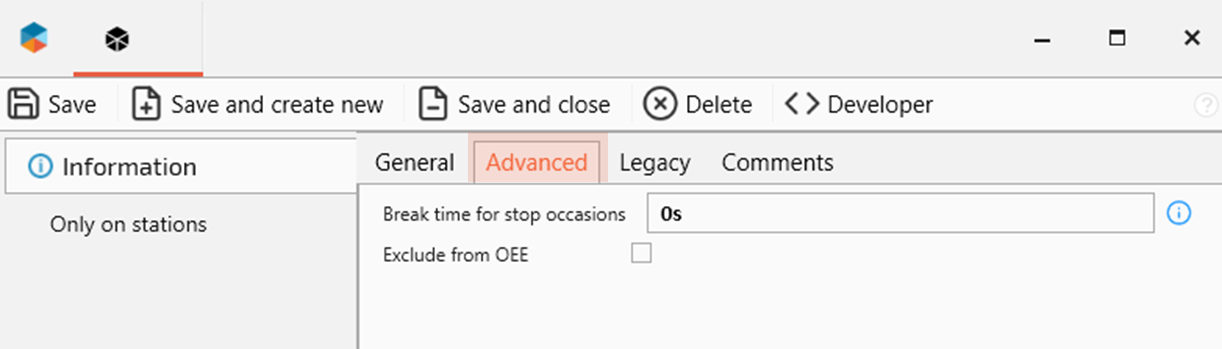
Exclude from OEE | By opting for a reason code to be excluded from OEE, the loss time will be outside the OEE calculation, but the stop will still appear in the stop reports. Read more about Shift schedule | |
Break time for occassions | Optional Only for stop (downtime + speed loss) | The number of seconds that must pass between two stops of the same reason until RS Production counts it as a new stop occassion. Stop occassions is something else than number of stoppages. Stop occassions is added to RS Production to handle the calculation of different average times like MTBF and MDT. Many times a machine breakdown causes several stops on the time line. But when calculating the Mean time between failure (MTBF) you want to handle all the stops as one occassion. Otherwise the maintenance idicators will be completely wrong. |
Legacy reason code settings
Settings here are no longer fully supported in the product and will over time be removed.
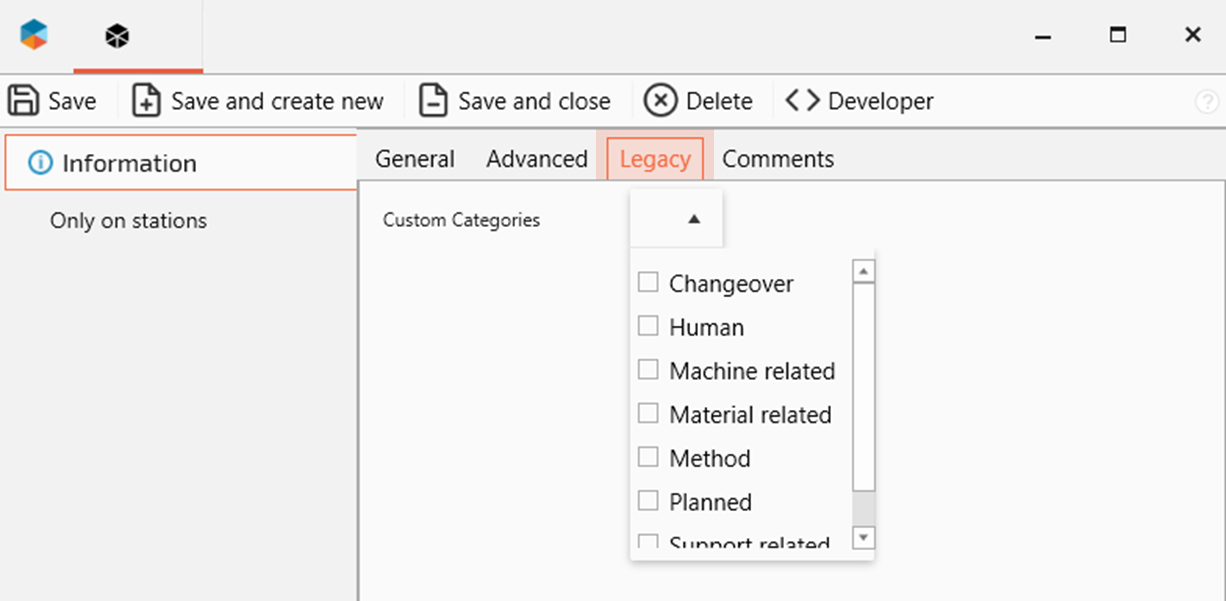
Custom Categories (formerly named “Categories”) | A non standardized way to group your loss reasons. It is possible to add/remove/adjust categories and their names. |
Assign reason codes to folders and measure points
To make the user interface easy for machine operators, RS Production use folders to only show relevant reason codes to machine operators. Read more about the concept Reason code folders
To manage existing folders click Folder structure on the left side of the Reason Manager. From here, you can overview the existing folders. They are now shown in the field to the left in the Reason Manager.

Set up your first folder structure
Setting up folders for the first time and adding reason codes to them takes a few easy steps
Create the folders you need
Set up the structure with Root folder and sub folders
Assign reason codes to the folders
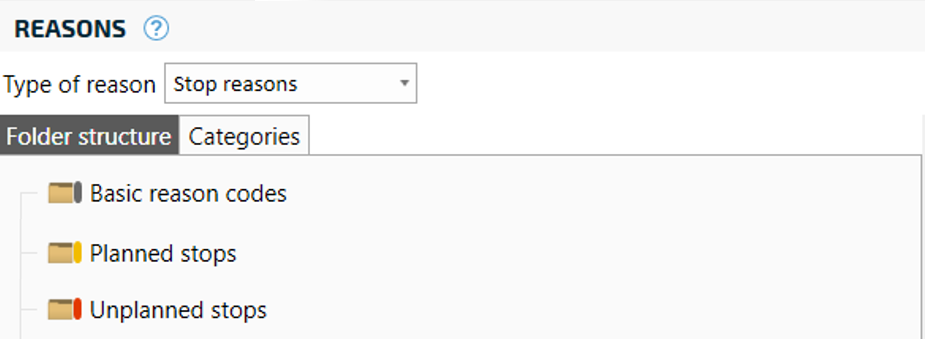
In this basic example we will create the following simple structure. It will take three folders. The one we call “Basic reason codes” will be the root folder and will not be shown to the operators.
The folder structure is shown in a way you recognize from Windows Explorer. Yellow folders that can be put into other yellow folders to create a tree structure.

![]() It is the root folders you can connect to a measurepoint. Each measure point can have only one root folder assigned and will automatically also get all the subfolders inside the root folder.
It is the root folders you can connect to a measurepoint. Each measure point can have only one root folder assigned and will automatically also get all the subfolders inside the root folder.
![]() Remember that folders are only shown to operators. They are here to make it easy for them to find the right reason code. Folders are not shown in reports.
Remember that folders are only shown to operators. They are here to make it easy for them to find the right reason code. Folders are not shown in reports.
Create the folders you need
First click Folders in the right part of the Reason Manager, then click Create folder

An empty folder card is now shown to you. It have very few parameters. You can set them when you create the folder, or you can come back and change them at any time.
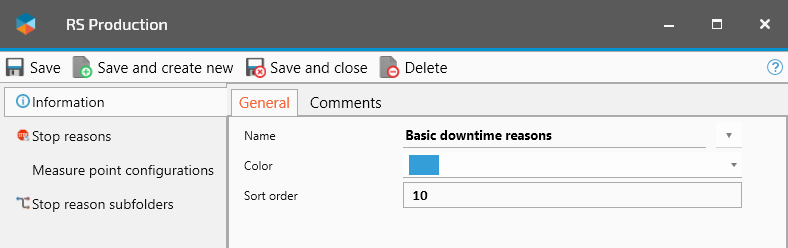
If you’re following the example, name the first one “Basic reason codes". Then, create two more and name them “Planned stops” and “Unplanned stops”.
![]() Note that it is possible to create a folder structure with as many levels as you want. But the more levels, the more complicated for the machine operator. We recommend to use maximum two levels.
Note that it is possible to create a folder structure with as many levels as you want. But the more levels, the more complicated for the machine operator. We recommend to use maximum two levels.
Name | The name shown for operators. Note that there’s language support for this one. Different users can see the same information in their selected language. | |
Color | The color that will visualize folder. | |
Sort order | Decides in what order the folders are shown in Operator tools. Lowest number first. From left to right and from top to bottom. |
Set up the structure with Root folder and sub folders
All folders that are yet not assigned as sub folders to any other folders are seen as root folders.
To make “Planned stops” a subfolder to “Basic reason codes”
Mark “Basic reason codes” on the left side of the reason manager.
On the right side of the Reason Manager, click the “Planned stops” folder
Now it appears in the middle section of the Reason Manager
Repeat step 2 for the “Unplanned stops” folder as well.
In the left area of the Reason Manager, our sub folders are now structures inside/below the root folder.
When “Basic reason codes” is marked in the left area of the Reason Manager, our two sub folders are shown in the middle section of the Reason Manager

![]() Note that the middle section of the Reason Manager visualizes the folders (and reason codes) exactly as the operator will see it in Operator tools.
Note that the middle section of the Reason Manager visualizes the folders (and reason codes) exactly as the operator will see it in Operator tools.
Assign reason codes to the folders
The final step will be to add reason codes to the folder structure.
In the left area of the Reason Manager mark the folder you want to add the reason codes to
Click Reasons in the right area of the Reason Manager. It will now show your complete list of reason codes.
Every reason code you click on in the right area of the Reason Manager is moved to the middle section of the Reason Manager and is now assigned to the folder you selected in step 1 above
If you want to remove a reason code from a folder. Just click on it in the middle section and it will be moved to the right area again.
![]() Note that one reason code can be assigned to any number of folders. That makes it possible to use the same reason code in many different reason code structures on different machines.
Note that one reason code can be assigned to any number of folders. That makes it possible to use the same reason code in many different reason code structures on different machines.
Managing and adding custom categories
Now it is time to look at custom categories and maybe add one ore more custom categories for your reason codes. Read more about Reason codes, categories and station codes .
![]() Note that using categories is optional. You can leave this if you're not ready to work with categories.
Note that using categories is optional. You can leave this if you're not ready to work with categories.
Manage existing custom categories
To manage categories click Categories on the left side of the Reason Manager. From here, you can overview the existing categories. They are now shown in the field to the left in the Reason Manager.
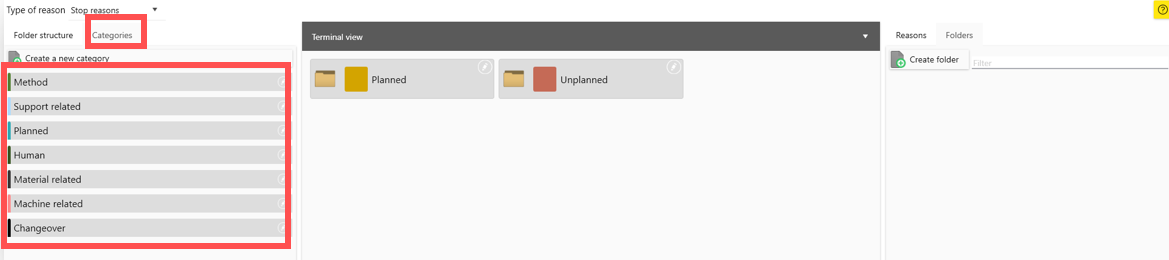
RS Production is distributed with default categories like Planned, Material related, Machine related, Method related. It is up to you own organisation what categories you want to use.
![]() Note that in versions prior to Neon (23.x.x.xx) the category “Machine” have a special position in RS Production. It is used to calculate the maintenance performance indicators (Technical availability, MTBF, MDT).
Note that in versions prior to Neon (23.x.x.xx) the category “Machine” have a special position in RS Production. It is used to calculate the maintenance performance indicators (Technical availability, MTBF, MDT).
Use pen-icon to open category editor
To open the category editor, click the Pen-icon on the right side of the category row.
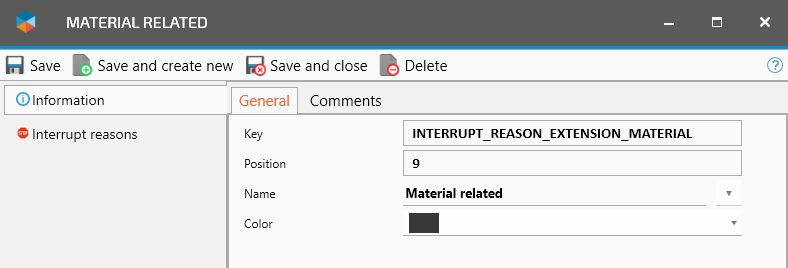
Name | The name shown for operators. Note that there’s language support for this one. Different users can see the same information in their selected language. | |
Color | The color that will visualize folder. | |
Sort order | Decides in what order the folders are shown in Operator tools. Lowest number first. From left to right and from top to bottom. |
Add new custom categories
First click Categories in the left part of the Reason Manager, then click Create a new category

An empty category card is now shown to you. It have very few parameters. You can set them when you create the category, or you can come back and change them at any time.
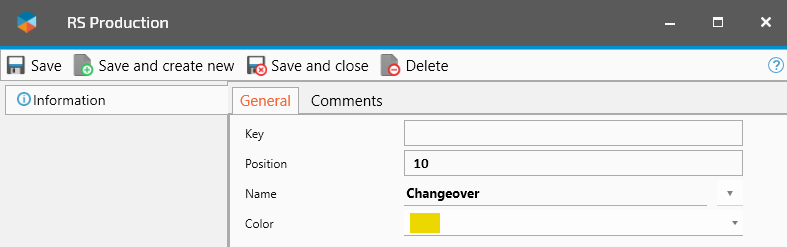
Click Save and close when you’re done (or Save and create new to open make one more).
When ready adding (one or more) categories. They appear in the categories field to the left in Reason Manager.
Assign a custom category to a reason code
In the left area of the Reason Manager, select Categories.
In the right part of the Reason Manager, select Reasons.

In the left area of the Reason Manager mark the category you want to add the reason codes to
Every reason code you click on in the right area of the Reason Manager is moved to the middle section of the Reason Manager and is now assigned to the category you selected in step 1 above
If you want to remove a reason code from a category. Just click on it in the middle section and it will be moved to the right area again.
![]() Note that one reason code can be assigned to any number of categories. But we recommend to only use one category per reason code.
Note that one reason code can be assigned to any number of categories. But we recommend to only use one category per reason code.