Import orders from CSV-file
Summary
This guide explains how to create a new file import definition to import a ready made .csv file.
IMPORTANT - Close the .csv file before importing, otherwise it won't work. At the bottom of the page an example .csv file can be found.
The CSV import is a standard function and is included in all RS Production installations.
Data structure
When importing for example an order file you will beside importing the order also be able to import article, articletype and other parameters.
The first step is to create a FileImportSequence, which then will have a number of FileImportSequenceItem's connected to it, depending on how many types of date will be imported.
All FileImportSequenceItem's have a sequence number and a FileImportDefinition.
The FileImportDefinition is an object that tells the RS Production importer how it should import a specific type from the csv file. It contains a number of FileImportColumnDefinition's, one for each column that will be imported.
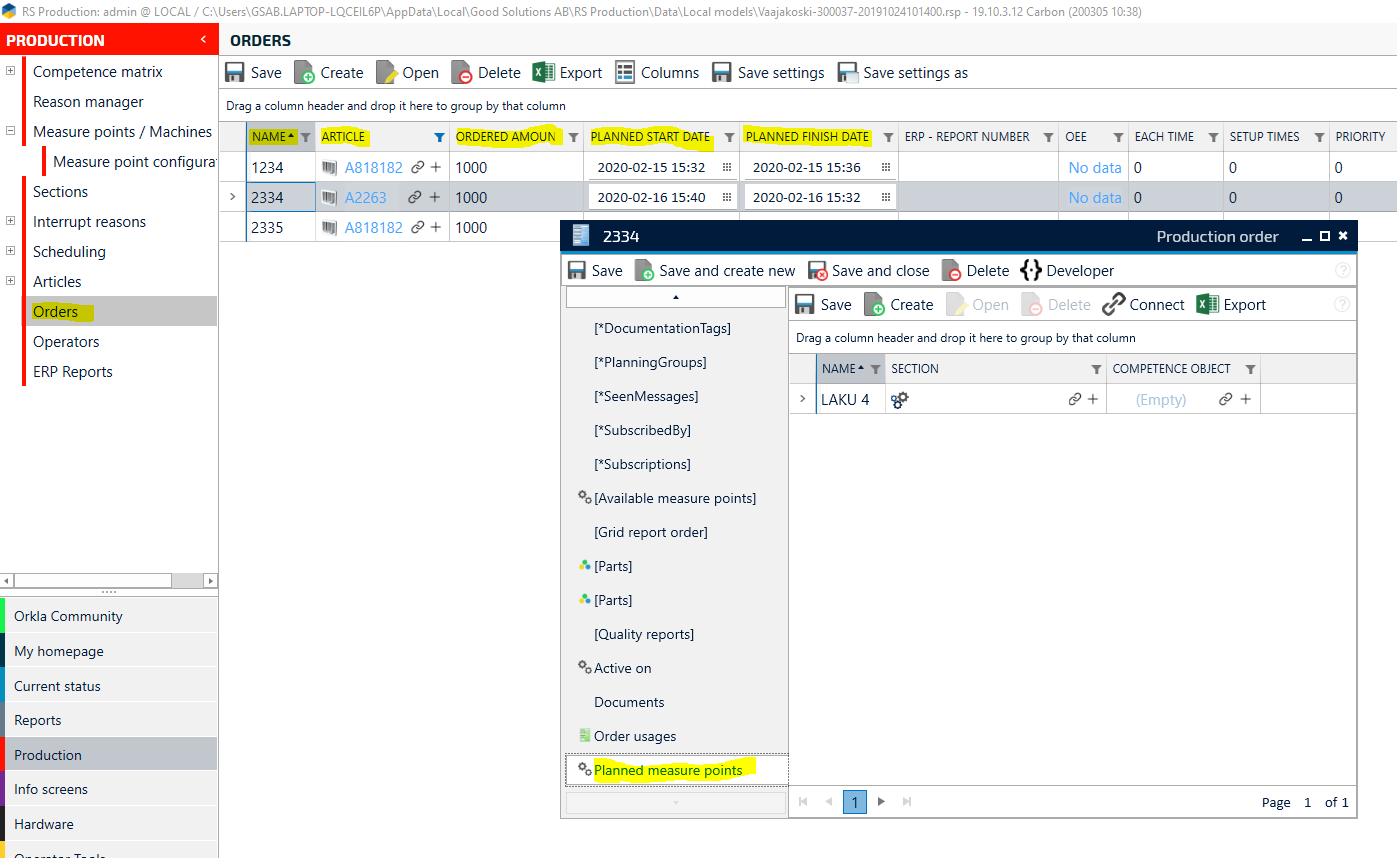
Example production order import with articles
All explanations will be based on this example, so frequent references to it will be made
in the steps.
Importing articles
Step 1
We strongly recommend that you for your first try create a local model of the installation you will import data to, and subsequently try to import data to the local model before doing it on the live installation.
Step 2
Search RSStart for "FileImportDefinition" and open the list with items.
Step 3
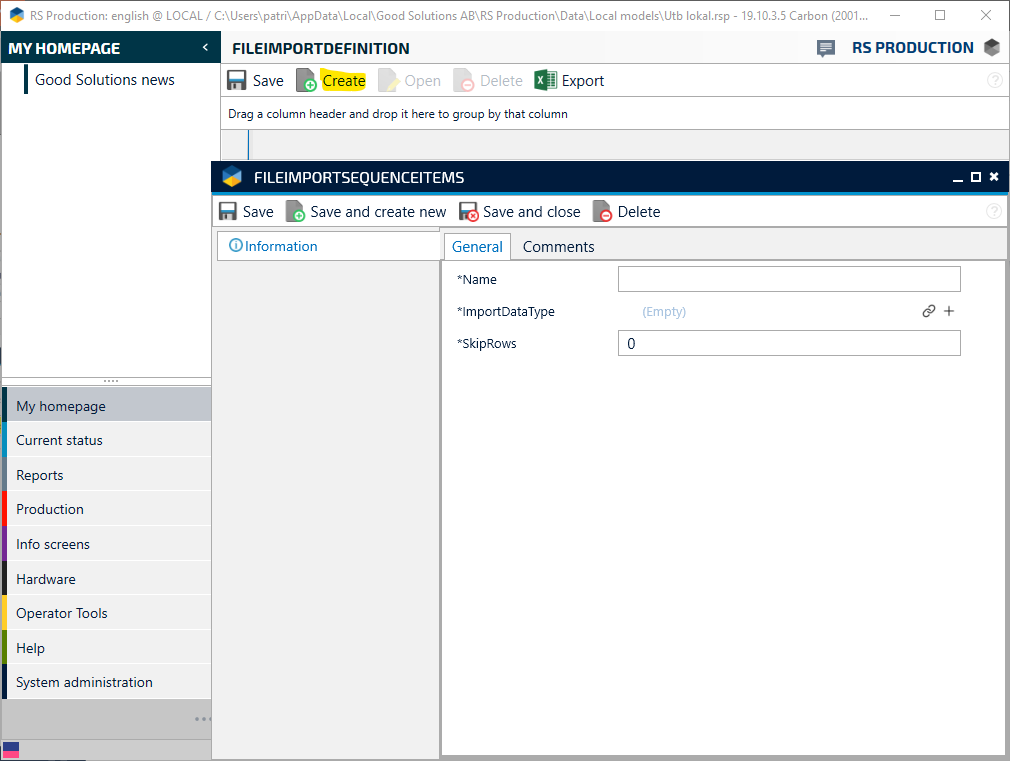
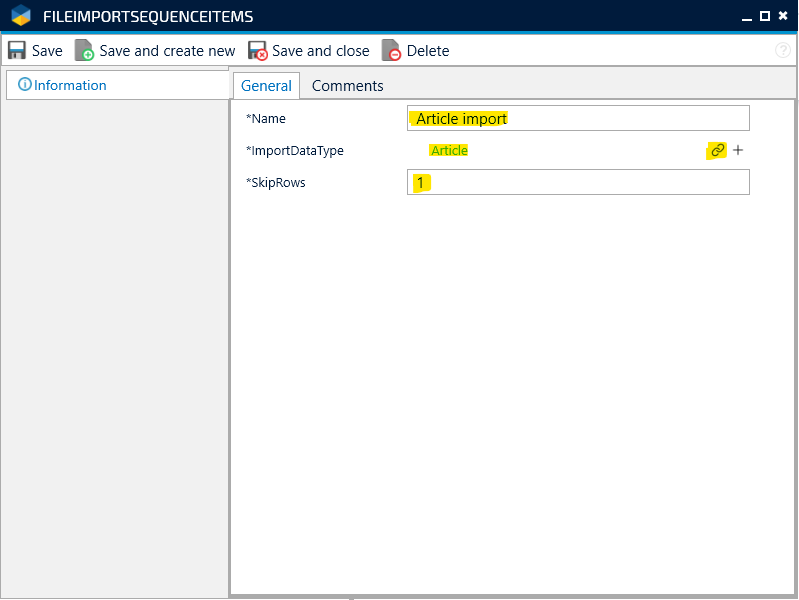
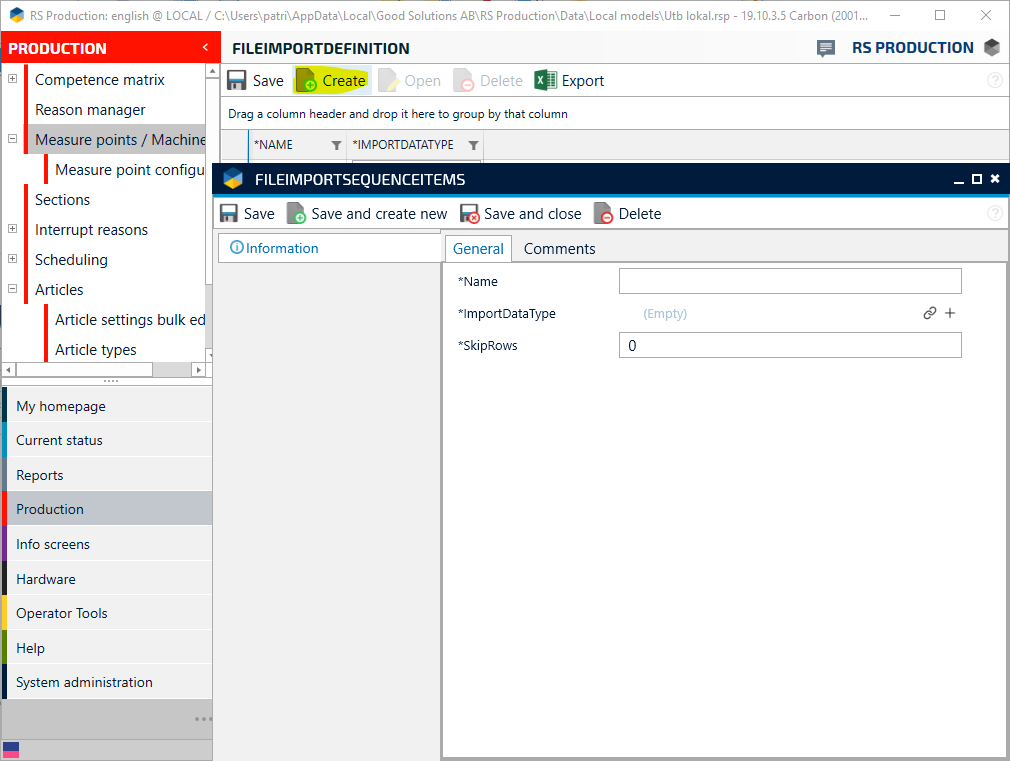
Create a new FileImportDefinition
Step 4
Give it a name.
Select "Article" in type to import.
Set the number of rows to skip to 1, this is because the first row in this csv-file is the headers.
Step 5
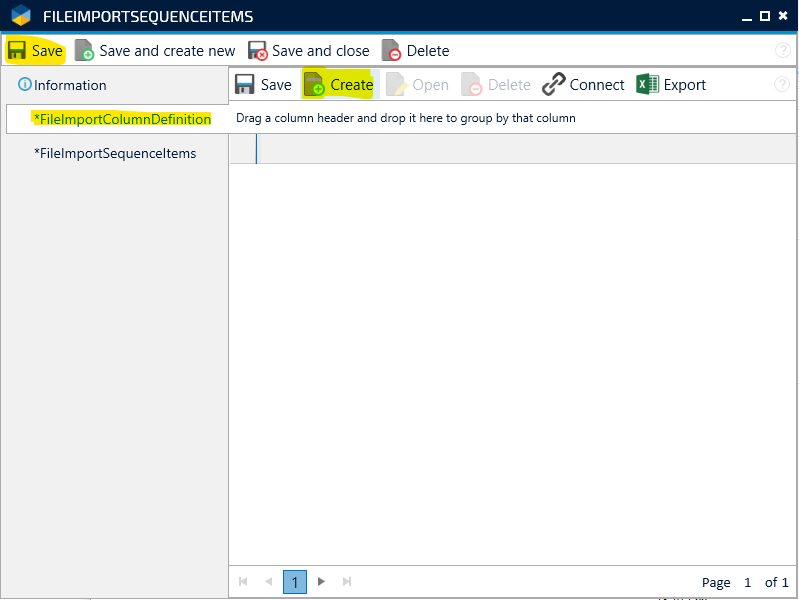
Save the FileImportDefinition, then go to FileImportColumnDefinition.
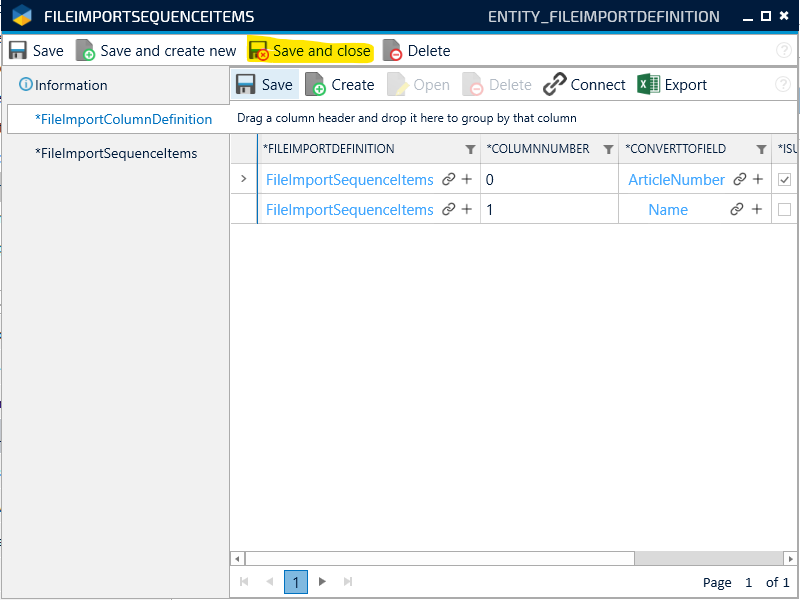
It's by creating FileImportColumnDefinition's that you define which columns means what in the .csv file.
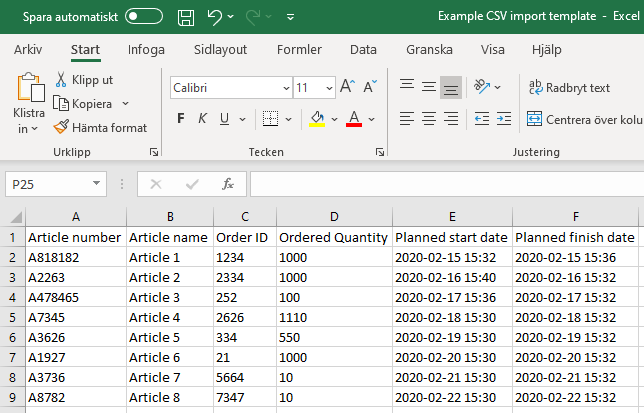
Two columns in this example are interesting for the import of articles from the csv-file, Column A and B which correspond to the article number and name.
The columns need to be translated to numbers, A is equal to 0 and that makes B = 1 and C = 2 and so on.
Create a new FileImportColumnDefinition.
Step 6
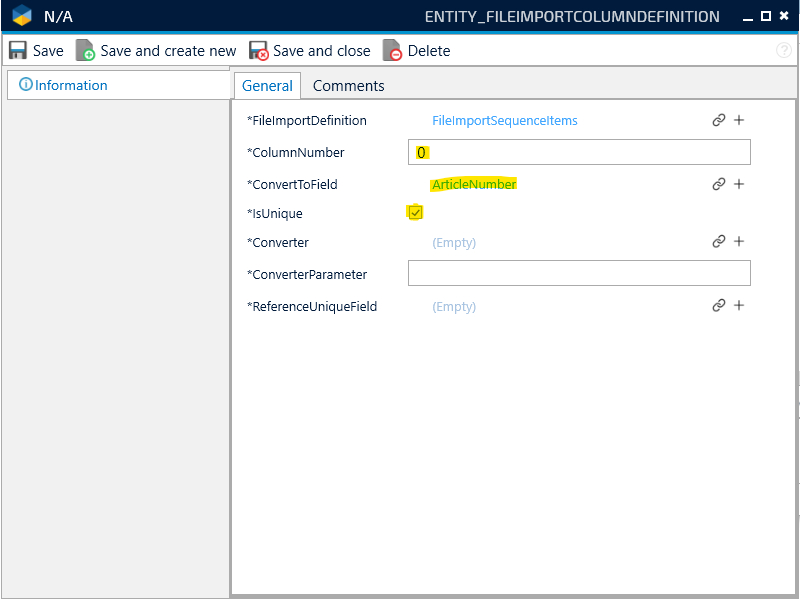
This first definition is for the ArticleNumber field.
Column will in this example be 0.
Choose "ArticleNumber" as the field to import to.
This is also going to be the unique key for this definition. All FileImportDefinitions must have 1 unique field.
Leave all other fields unchanged. They are used when you have to convert a text to a number or if you want to connect items together (ProductionOrder and Article for example, which we will look at further down in this guide).
Click "Save and create new".
Step 7
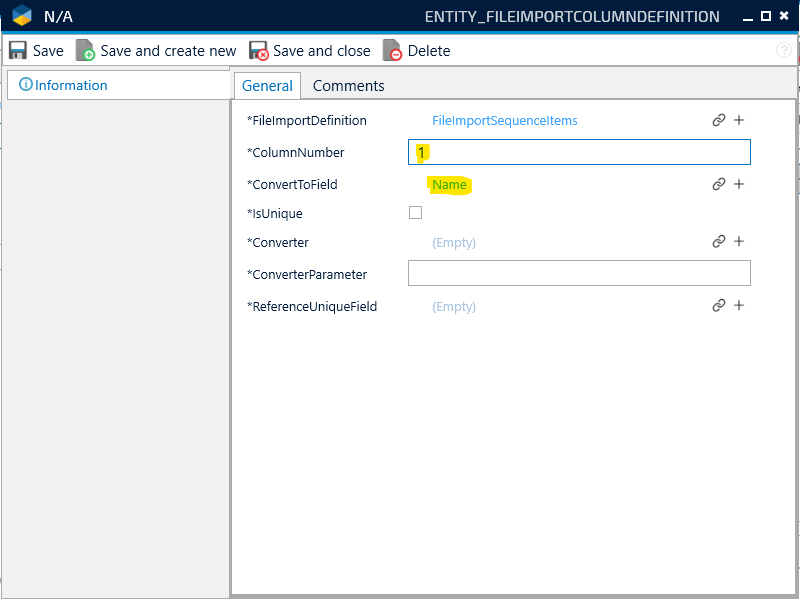
Create one more definition for the name of the article.
The column number will in this example be 1.
Choose "Name" as the field to import to.
All other fields will be left unchanged.
Click "Save and close".
Step 8
Click "Save and close"
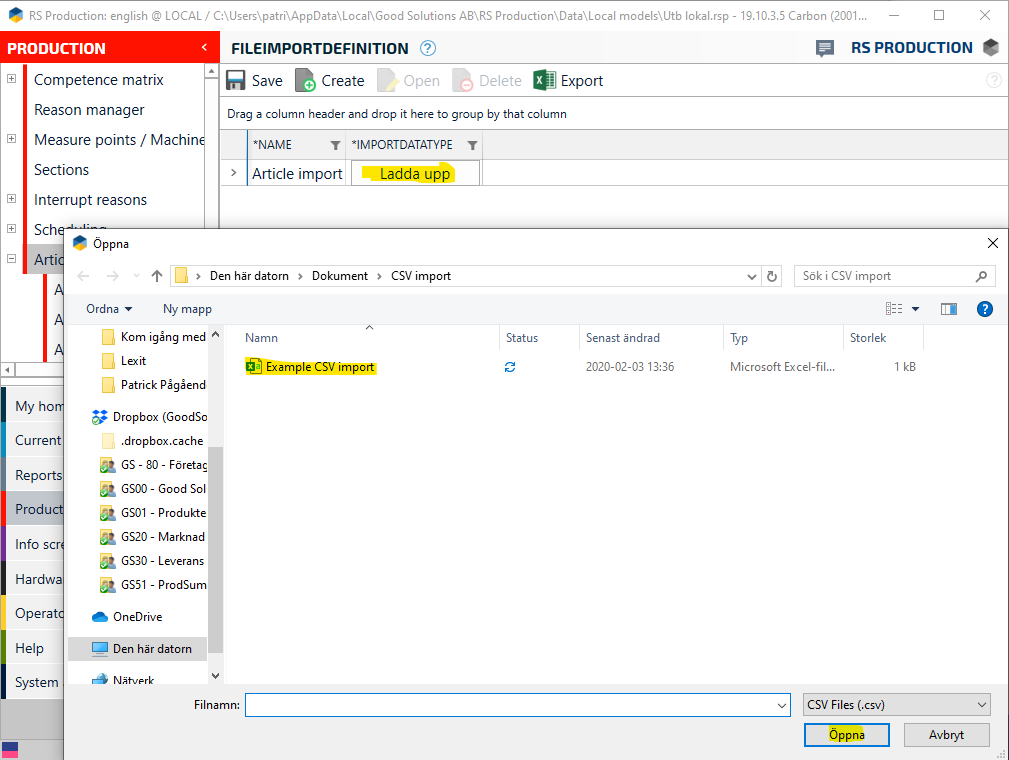
Step 9
Now it is time to test the article import definition.
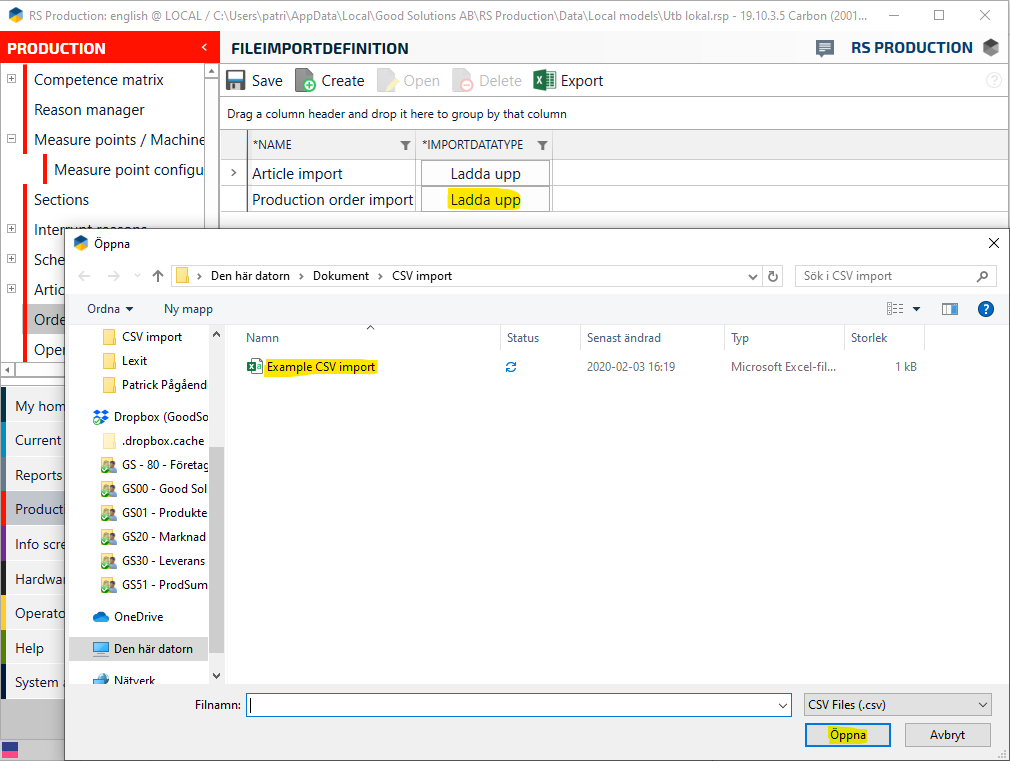
Click "Ladda upp".
Select the .csv file and then click "Open".
Step 10
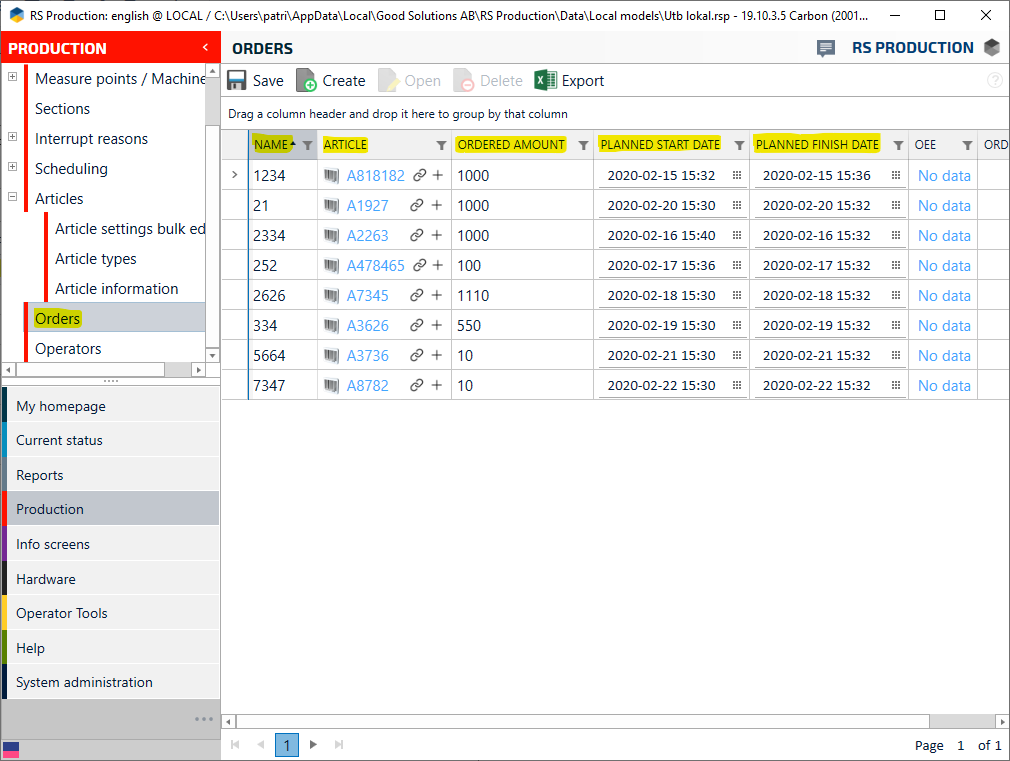
Go to the article list and make sure that the articles were imported.

Step 11
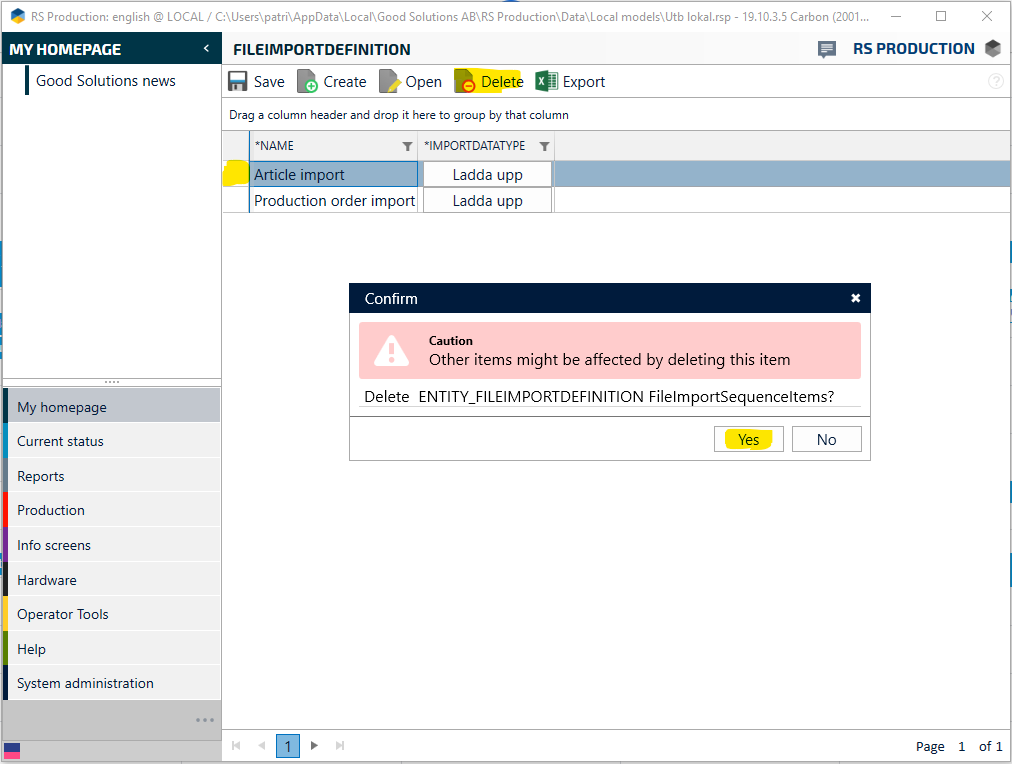
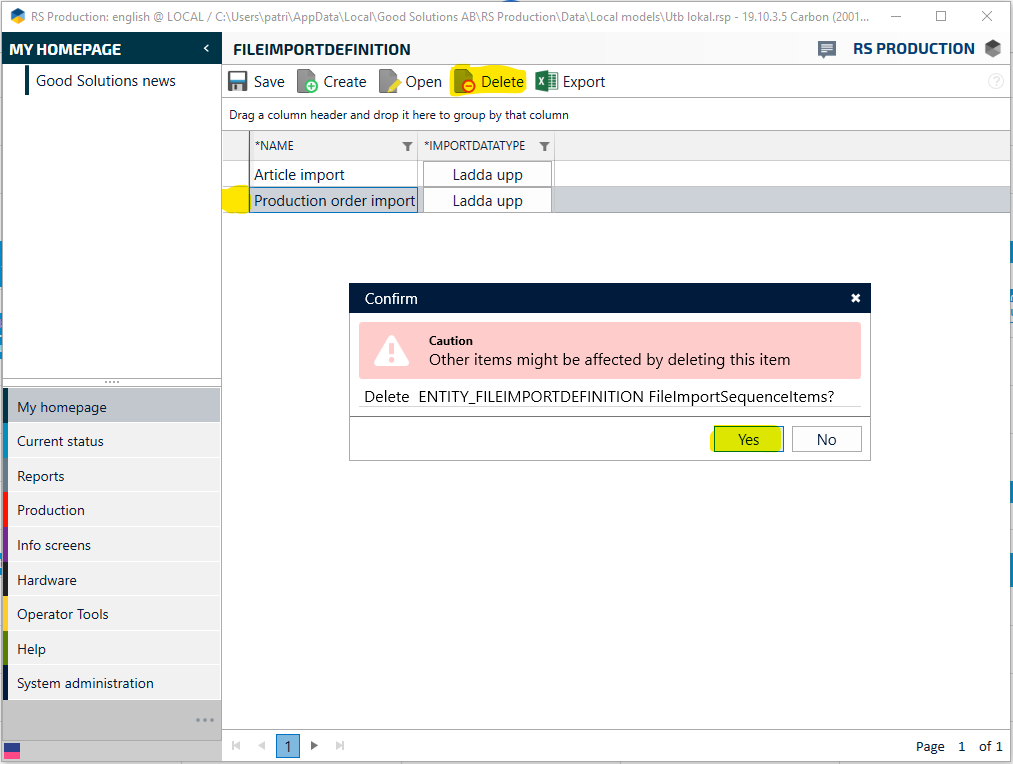
If this is a one time import it is imperative that you delete the import button.
Step 12
If the customer shall continue using the import function, give the customer instructions on how to do it, i.e. give the customer access to the "ladda upp" button.
The customer shall not have the possibility to create own structures.
It is also of crucial importance that you explain the structure of the csv file, if the customer were to change the structure it could have devastating consequences for the system.
Importing Production orders
Step 1
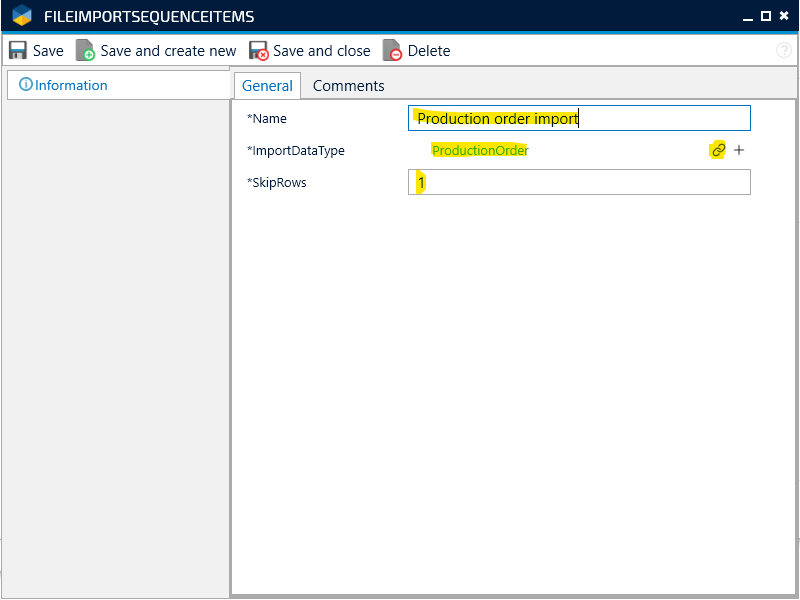
Create a new FileImportDefinition for the production order.
Step 2
Give it a name.
Select "ProductionOrder" in type to import.
Set the number of rows to skip to 1, this is because the first row in this csv-file is the headers.
Step 3
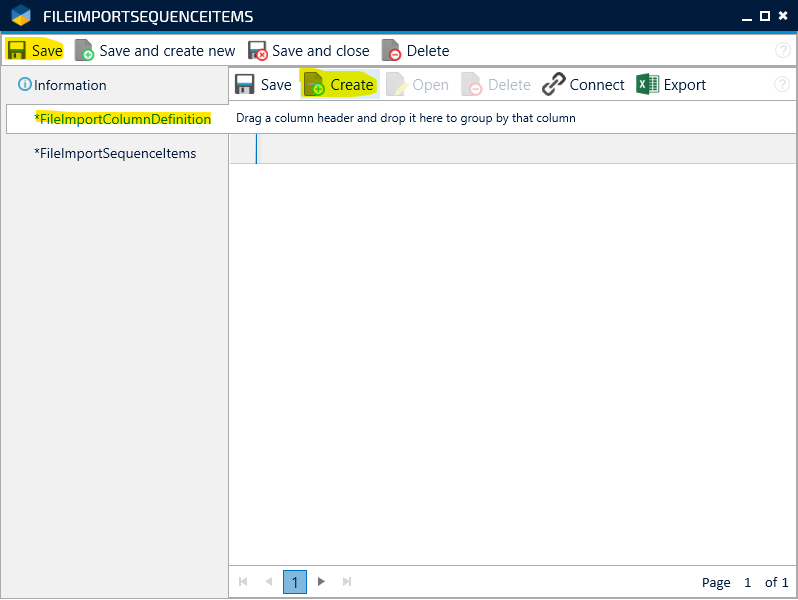
Save the FileImportDefinition, then go to FileImportColumnDefinition.
It's by creating FileImportColumnDefinition's that you define which columns means what in the .csv file.
The columns need to be translated to numbers, A is equal to 0 and that makes B = 1 and C = 2.
Create a new FileImportColumnDefinition.
Step 4
This first definition is for the Ordernumber field.
The column in this example will be 2.
Choose "Name" as the field to import to.
This is also going to be the unique key for this definition. All FileImportDefinitions must have 1 unique field.
Leave all other fields unchanged. They are used when you have to convert a text to a number or if you want to connect items together (ProductionOrder and Article for example, which we will look at further down in this guide).
Click "Save and create new".

Step 5
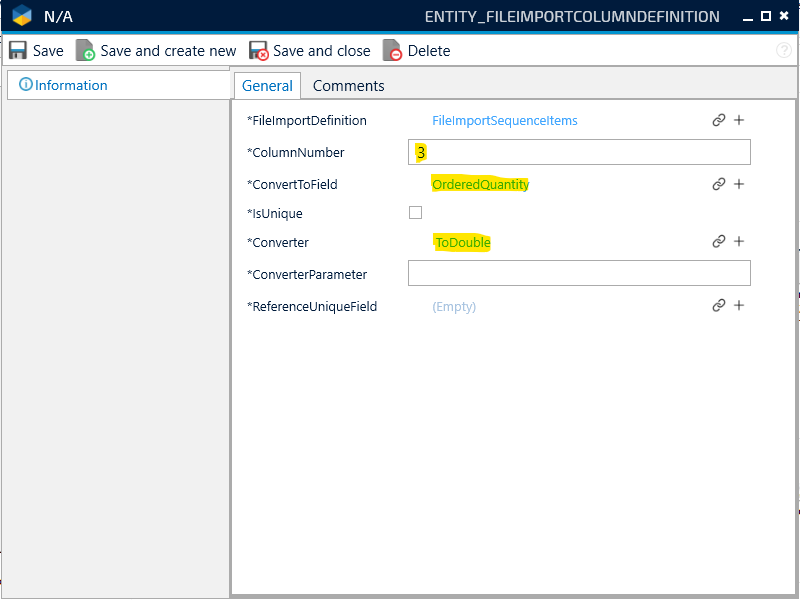
Create the definition for the ordered quantity.
The column number will in this example be 3.
Choose "OrderedQuantity" as the field to import to.
For this field we need a converter to convert the column to a number, choose "ToDouble".
All other fields will be left unchanged.
Click "Save and create new"
Step 6
Now we have to connect an article to the production order.
Create a definition for the article connection.
The column number will in this example be 0.
Choose "Article" as the field to import to.
When connecting items the importer will need to know what field to look at. So when connecting the order to an article you have to choose what field on the article to check.
Select "ArticleNumber" as "ReferenceUniqueField".
All other fields will be left unchanged.
Click "Save and close"

Step 7
It is not mandatory but it is also possible to connect Planned start date, if this isn't relevant please skip this step.
Converter must be set to "DateTime".

Step 8
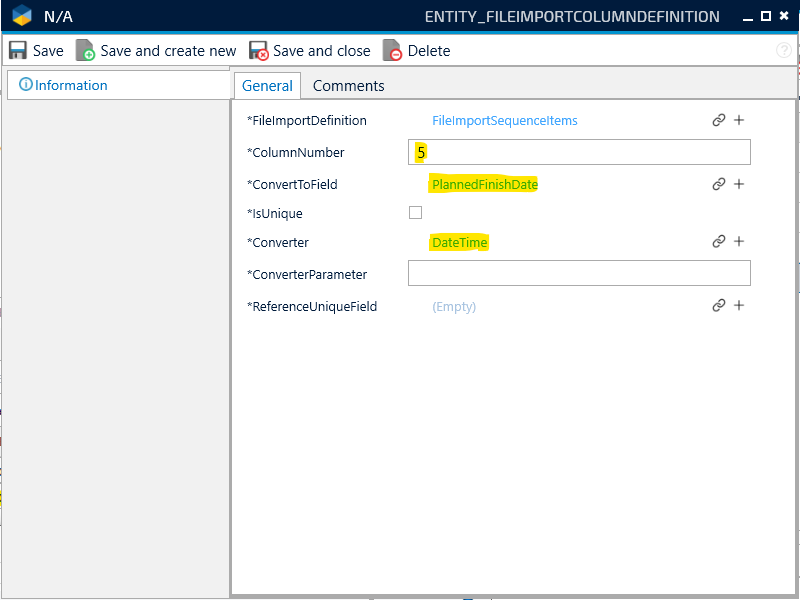
It is not mandatory but it is also possible to connect Planned finish date, if this isn't relevant please skip this step.
Converter must be set to "DateTime".
Step 9
Save and test the import definition for ProductionOrder's.
Step 10
Check so that the orders are imported and that they get an Article set.
Step 11
If this is a one time import it is imperative that you delete the import button.
Step 12
If the customer shall continue using the import function, give the customer instructions on how to do it, i.e. give the customer access to the "ladda upp" button.
The customer shall not have the possibility to create own structures.
It is also of crucial importance that you explain the structure of the csv file, if the customer were to change the structure it could have devastating consequences for the system.
Example CSV import template1.csv
Importing Production orders along with Measure points
Follow steps 1- 8 from Importing Production orders.
Step 9
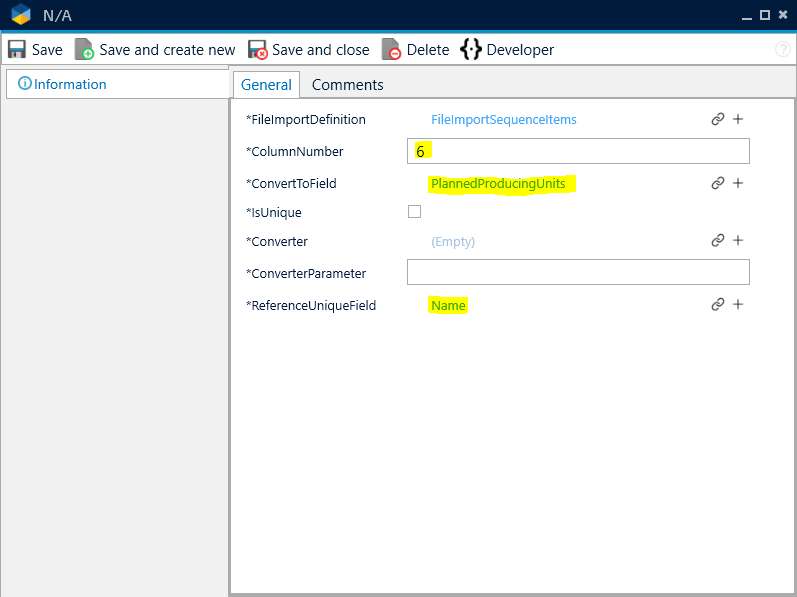
Now connect a measure point to the planned producing unit.
Create a definition for the measure point connection.
The column number in this example will be 6.
Choose "PlannedProducingUnits" as the field to import to.
When connecting items, the importer will need to know what field to look at. So when connecting the order to a measure point, you have to choose what field on the producing unit to check.
Select "Name" as "ReferenceUniqueField".
All other fields will be left unchanged.
Click "Save and close"
Follow steps 9 and 10 from Importing Production orders.
Step 11
Check that the orders are imported and the measure points are linked to the orders.